OK. So I needed to do this. And I needed to do it now. If I didn't do it now, I'd never do it. So I did it. The hardest part is blogging. So that's why you will get this in two installments. Today is the HOW-TO, and tomorrow will be the TA-DA!
I've been looking at design pages, checking out catalogs and online stores, that kind of stuff. Mostly looking for a solution for our living room. It's like a cave. We live below the street level (weird slope to the property outside out apartment.) and under several large pine trees. So the already dark winter seems that much darker with no natural sunlight. Chris and I agonized over lamps for months, finally settling on some coppery lamps with a funky hole in them and a cream linen shade. I love them. Chris loves them. But they do NOT put off enough light to fill this room. In an apartment, we have few options. We can't wire in a new light, we are limited on what we can permanently change. So the solution, for us anyway, was a pendant style lamp that we could plug into the wall with only a plant hook in the ceiling (something our management doesn't care about!)
 Here's the inspiration for this project... It's not an original concept, everyone does it. But I wanted to do it differently. I wanted to use pieces I chose, not just generic jars. So I hunted thrift stores and eventually an antique mall in Sellwood (Stars, I love that place. lots to choose from, mostly reasonably priced) I found a couple SUPER cheap jars at Goodwill and some much more expensive ones at Stars. Expensive is relative. One was $8 and one $12. We went to the Light Bulb Lady on Mississippi and got all the parts we needed, plus some ideas on how the best way to proceed would be.
This is the disclaimer: I come from a family of electricians. Shepherds play with wires. It's in the genes, man. I've been zapped a few times, I'm no stranger to it. BUT- I'm not a trained electrician. I will not pretend to dispense electrical advice. This tutorial is a log of how I created my project, you should check with someone and make sure you are doing the right thing. My biggest concerns for someone replicating are that you use the proper gauge wire for what you are trying to put through it and that you use the proper wattage bulbs. So my SUGGESTIONS on those two fronts are as follows: 1- I used 16 gauge wire. The wire I selected is a clear sheathed copper wire. I did this because I wanted the exposed wire to look intentional and to match the lamps. It is of proper gauge to handle the size light bulbs I want and then some. Better to err on the side of caution as opposed to start fires! 2- Smaller bulbs are better. Seriously. This is not only to make sure you don't overload your wall outlet or the wire, but so you don't burn out your bulbs! With them being enclosed completely in a glass jar, you run the risk of heat being an issue and burning out bulbs as well. So stick to a 15 watt bulb please.
Back to the program. Here's what you're going to need...


Once you have this done, thread the other pieces of the fixture down the wire, including the little black insulator piece. When you have everything down, screw it all together.

Third: Put the plug on. This is probably the easiest thing you will do this whole project. Pull the plug part out of the housing. Stick the wire through the hole in the top.
Then pull the sides apart and stuff the wire down inside. It doesn't matter which way for this either with the parts I got. Crimp the sides back in and you're ready to stuff the prongs back into the housing.

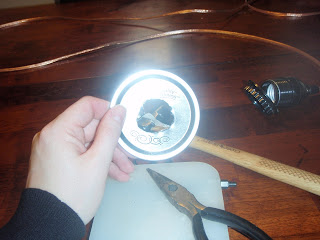
Fourth: Put your bulb in, it's time for a test run. Plug it in. If it turns on, you did it right. If it doesn't, your wires are backward. If it pops your breaker, I'm sorry! I had this happen when I wired a light socket backwards once, I don't know that a lamp will do the same. In theory, it should just not turn on. But beware the breaker popping thing. Don't let it scare you, just be aware. If it happens, flip the breaker back on, unscrew your light fixture assembly, and switch your wires cause you put them on wrong. Then screw it back together and try again. Take the bulb out once you know it works.

Fifth: Get your can lid. Not the ring, just the lid. Now, I will say that there are a dozen ways I can think to do this better. But since I have limited tools at home and didn't want to go buy stuff just to do this, I improvised... Quite well! Take the fixture and trace around the bottom to get your hole size. Use the sharpie.

Using the screw and the hammer and your block, punch a small hole in the lid. Then screw the screw in to make a larger hole. Doesn't have to be big. Just big enough to get the pliers in. Now here's the fun part. Basically, you're going to open this sucker up like an old school can. Take ahold of the hole and start tearing. Using the circle as a guide, just pry it up in a circle. This was much easier than I anticipated.

Once you are done, slide (or in my case, the hole was TIGHT, so I had to screw it on) the lid on to the fixture and thread the holder ring up to secure it. Slide the ring on from the plug end, screw your light bulb back on, and screw the whole assembly onto the jar.
That's it. It's that easy. I made 3 of these in an hour, start to finish, and I had to figure it out as I went.

Finished product!!! Tune in tomorrow for the hanging, finished project! I need to spray paint my lids with a chrome copper paint to match the lamps and wire. And I need to go get my hook. I'll work on better pictures too. I LOVE the bulbs we chose, we got long skinny ones. I really wanted the Edison style bulbs, the ones with the super cool filaments. I would caution you on purchasing them for this project. They get very hot, use a TON of electricity, and are expensive. $15-$25 each and are NOT well suited to being completely enclosed so you are more likely to burn them out quickly due to overheating.
If you have questions, ask away and I'll do my best. Facebook will get you a faster answer. Or if you REALLY know me, you can text/call me. Otherwise, I'd love to see if you do this! If you want me to make you some, message me and we'll talk money and time.
I've been looking at design pages, checking out catalogs and online stores, that kind of stuff. Mostly looking for a solution for our living room. It's like a cave. We live below the street level (weird slope to the property outside out apartment.) and under several large pine trees. So the already dark winter seems that much darker with no natural sunlight. Chris and I agonized over lamps for months, finally settling on some coppery lamps with a funky hole in them and a cream linen shade. I love them. Chris loves them. But they do NOT put off enough light to fill this room. In an apartment, we have few options. We can't wire in a new light, we are limited on what we can permanently change. So the solution, for us anyway, was a pendant style lamp that we could plug into the wall with only a plant hook in the ceiling (something our management doesn't care about!)

This is the disclaimer: I come from a family of electricians. Shepherds play with wires. It's in the genes, man. I've been zapped a few times, I'm no stranger to it. BUT- I'm not a trained electrician. I will not pretend to dispense electrical advice. This tutorial is a log of how I created my project, you should check with someone and make sure you are doing the right thing. My biggest concerns for someone replicating are that you use the proper gauge wire for what you are trying to put through it and that you use the proper wattage bulbs. So my SUGGESTIONS on those two fronts are as follows: 1- I used 16 gauge wire. The wire I selected is a clear sheathed copper wire. I did this because I wanted the exposed wire to look intentional and to match the lamps. It is of proper gauge to handle the size light bulbs I want and then some. Better to err on the side of caution as opposed to start fires! 2- Smaller bulbs are better. Seriously. This is not only to make sure you don't overload your wall outlet or the wire, but so you don't burn out your bulbs! With them being enclosed completely in a glass jar, you run the risk of heat being an issue and burning out bulbs as well. So stick to a 15 watt bulb please.
Back to the program. Here's what you're going to need...

- Jars. With lids and rings. I used different types, one is actually an old mill light fixture. When you're deciding how many, please be mindful that this sucker's gonna be heavy. It's jars, after all. I chose to stick with 3 because I felt confident that I would be able to manage the weight of that many.
- Wire. I purchased bulk wire from my lighting store, 12 feet per light. Measure ahead of time, give yourself a foot or so of play with each light, just in case. For me, it was 16 gauge clear sheathed copper.
- Plugs. One per light. I found idiot proof plugs, simply shove the wire in the hole, clamp down the sides, and push it back in. Done.
- Light bulb fixture and bulb that matches (yes, there are different sizes. Depending on what you want there are a million options. your best choices are going to be medium base or candelabra. Candelabra is the small base. Medium is the normal size. We chose a long skinny medium base.) . The ones I got are a 3 piece screw apart setup with screws to put your own wire into. They sell ones that have the black and white wire already pigtailed on, but I didn't want that wire, I wanted to wire my own. Up to you. It's SUPER easy to wire them up.
- Wire protector. This is the little black guy that goes into the top of the light fixture. It keeps the wire from pulling out or rubbing with movement. Get it. If nothing else, it made me feel better about the weight of the jar not pulling the wire out.
- Tools- sharpie, screw, screw driver,needle nosed pliers, hammer, something to pound on (I used an eyelet setting block), wire strippers/cutters (shhh, you don't really need them. With a steady hand, you can just use a pocket knife to cut the sheathing carefully and strip it off by hand. Sure is easier with the right tools.)
So here we go... Jumping right in. Again, disclaimer. I know there are probably other tutorials on this. I didn't use one. I didn't look at one or for one. I just dove in head first. Cause that's how I roll. Don't do ANYTHING until you read ALL the directions. PLEASE.
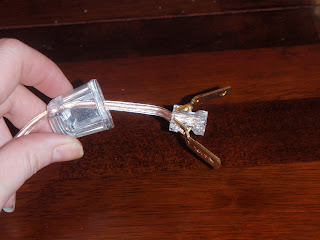
First: Cut your wire to length. Use the wire cutters, yep... Now's the time to hope you have wire cutters. Now where the wire is scored in the middle, cut it up about 1 1/2 inches so you have two little separate wires. Don't cut them off. It all needs to stay attached. Now using the correct gauge hole on your wire cutters, strip the sheathing off the wire on each side, about 1/2 inch up each. Look at the picture. The wire will be a bit crazy, like frizzy hair. Gently twist it so that it stays in a nice little tight roll.

Second: Take the twisted piece of wire and wrap it around each screw. Then screw down the screw tightly, making sure the wire stays under the screw. With the setup I got, it didn't matter which side was which. When you purchase your fixture, you should ask, it may.

Once you have this done, thread the other pieces of the fixture down the wire, including the little black insulator piece. When you have everything down, screw it all together.

Third: Put the plug on. This is probably the easiest thing you will do this whole project. Pull the plug part out of the housing. Stick the wire through the hole in the top.

Then pull the sides apart and stuff the wire down inside. It doesn't matter which way for this either with the parts I got. Crimp the sides back in and you're ready to stuff the prongs back into the housing.

Fourth: Put your bulb in, it's time for a test run. Plug it in. If it turns on, you did it right. If it doesn't, your wires are backward. If it pops your breaker, I'm sorry! I had this happen when I wired a light socket backwards once, I don't know that a lamp will do the same. In theory, it should just not turn on. But beware the breaker popping thing. Don't let it scare you, just be aware. If it happens, flip the breaker back on, unscrew your light fixture assembly, and switch your wires cause you put them on wrong. Then screw it back together and try again. Take the bulb out once you know it works.

Fifth: Get your can lid. Not the ring, just the lid. Now, I will say that there are a dozen ways I can think to do this better. But since I have limited tools at home and didn't want to go buy stuff just to do this, I improvised... Quite well! Take the fixture and trace around the bottom to get your hole size. Use the sharpie.

Using the screw and the hammer and your block, punch a small hole in the lid. Then screw the screw in to make a larger hole. Doesn't have to be big. Just big enough to get the pliers in. Now here's the fun part. Basically, you're going to open this sucker up like an old school can. Take ahold of the hole and start tearing. Using the circle as a guide, just pry it up in a circle. This was much easier than I anticipated.


Once you are done, slide (or in my case, the hole was TIGHT, so I had to screw it on) the lid on to the fixture and thread the holder ring up to secure it. Slide the ring on from the plug end, screw your light bulb back on, and screw the whole assembly onto the jar.
That's it. It's that easy. I made 3 of these in an hour, start to finish, and I had to figure it out as I went.

Finished product!!! Tune in tomorrow for the hanging, finished project! I need to spray paint my lids with a chrome copper paint to match the lamps and wire. And I need to go get my hook. I'll work on better pictures too. I LOVE the bulbs we chose, we got long skinny ones. I really wanted the Edison style bulbs, the ones with the super cool filaments. I would caution you on purchasing them for this project. They get very hot, use a TON of electricity, and are expensive. $15-$25 each and are NOT well suited to being completely enclosed so you are more likely to burn them out quickly due to overheating.
If you have questions, ask away and I'll do my best. Facebook will get you a faster answer. Or if you REALLY know me, you can text/call me. Otherwise, I'd love to see if you do this! If you want me to make you some, message me and we'll talk money and time.


wow that looks really awesome!!! cool. and so glad to have you back blogging again - i missed you xxx
ReplyDelete